
Blender is one of the coolest pieces of open source software available because it puts a professional full production workflow in your hands for 3D modeling, animation, video editing, post processing, and even game development. And if you have ever used the wonderful open source application Blender for anything non-trivial, you will have discovered that rendering complex scenes can take a long, long time. Render farms split up large processing jobs among many computers, allowing everything to move much faster.
There is a solution for remote rendering in Blender that is both easier and harder than you thought at the same time. I've recently run into long render times myself and I constructed a make shift personal render farm, utilizing both spare computing power I have around the house as well as virtualized servers on Microsoft's Azure cloud service. This has decreased my render times by a considerable amount.
How did I do it?
First, let's look at how Blender handles its networked rendering. Blender comes with an add-on called Netrender. You don't want to use it. You want to use an enhanced fork of the add-on that you can find on Github. Once installed, you can enable it in Blender under File > User Preferences > Add-ons.
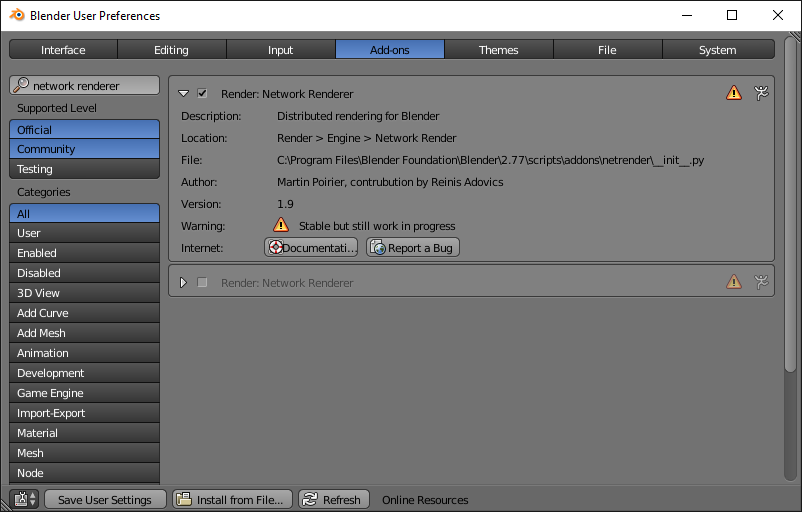
Once enabled, you'll find another option in the render engine selection drop down: Network Render.

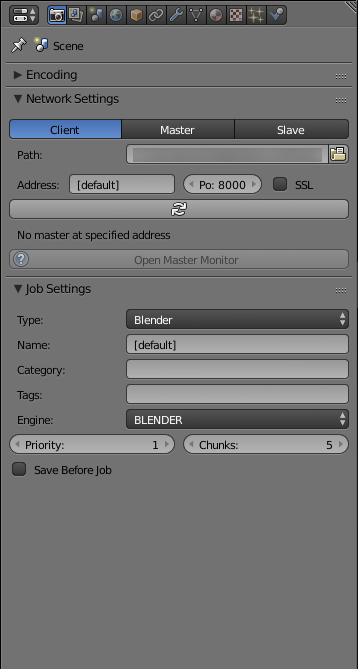
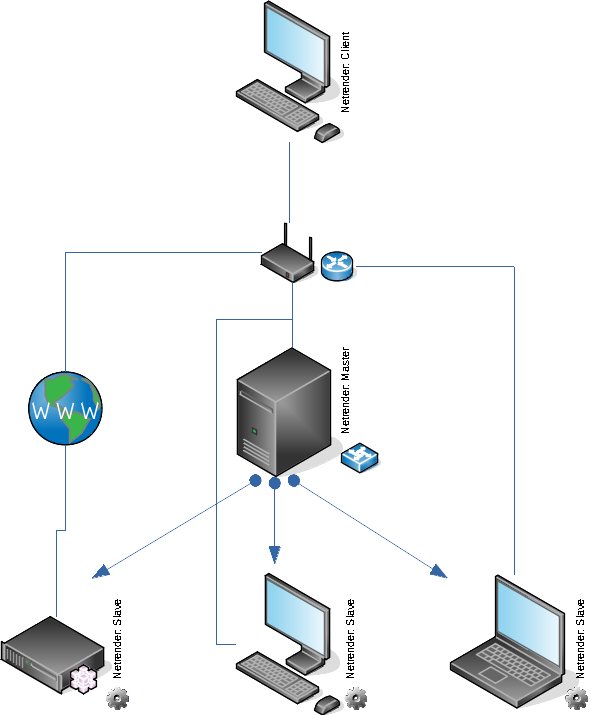
Netrender runs within a Blender instance, meaning that you have to have Blender open in order for it to work. It works in one of three modes.
Client
Client mode is used by the machine you're using to create your 3D scene. The client in this setup is the customer, requesting that it's work be done by someone else.
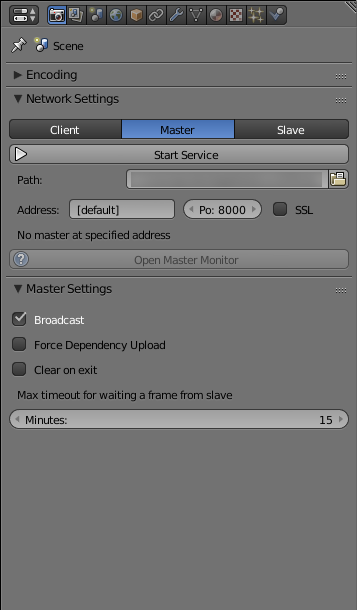
Master
Master mode is used by the co-ordinating server. The master is in charge of accept work requests from clients, processing the files, and dividing up the work among the slaves connected to it.
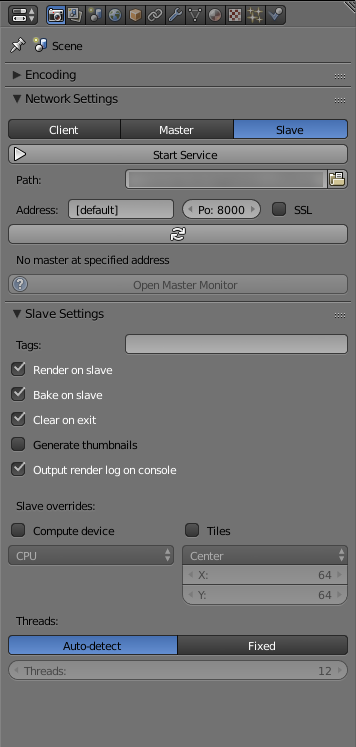
Slave
Slave mode is used by computers that get assigned work from the master.
When setting up my personal render farm, my daily-use desktop computer is my client (and a worker!), a computer within my LAN acts as my master server (and a worker!), and all spare computers in the house are connected as slaves. In addition, I have created several virtual machines in the Azure cloud, which all connect back to my internal network in order to receive work orders.
Setup
How easy, right? just plug in the proper IP addresses (or DNS entries for the external slaves) and port numbers and we're all set, right? Wrongo bongo. With Blender and Netrender, the devil is in the details. As with most complex software, Blender has what I would call quirks. Paired with being an open source project whose documentation can sometimes be lacking for lesser used features, you've got the potential for some odd problems where your Google-fu may not be of much use. My render farm came into being with a lot of experimentation and failure. Don't get discouraged if yours does as well! It's all just part of the learning process.
Masters
Luckily you don't need to put much thought into the master node. You may or may not want to force your clients to upload dependencies. In my experience, it hasn't mattered, but your mileage may vary there. You do want to pay attention to the maximum timeout setting, though. You'll want to set it to something sufficiently high so that slower machines (or machines that you have computing on both the CPU and the GPU) are not abandoned by the master if they take longer to render a frame.
Slaves
Always be aware if your slave has a GPU. GPU rendering, in general, is way faster for the Cycles engine. If so, I highly recommend using two instances of Blender, one with the override set to GPU, and one set to CPU. With both services running, you'll be able to get more use out of a single machine.
Also be aware of the tile size you want to process on the slave. CPU and GPU render times can be greatly affected by the tile size. Consider overriding the tile size, especially for GPUs. CPU times tend to be better when working on smaller tiles, around 32 pixels or 64 pixels. GPUs tend to do better with large tiles, around 128 pixels or 256 pixels.
Clients
The client setup is pretty straight forward, as it will just use the settings from the render engine you used while designing the .blend file. Just make sure that the Engine selection is set to the rendering engine of the .blend file. So if you designed everything in Cycles, but leave the render engine set to Blender in the network rendering options, you're not going to get anything back.
Headless Slaves
You may have computers available to you (either on site, or in the cloud) that do not have graphic devices attached. Blender needs a GPU in order to draw its 3D viewports. If your machine doesn't have one, Blender will refuse to open. However, Blender doesn't need a graphic device to render final images. Luckily, Blender has an extensive command line interface that you can use.
This kind of setup requires you to create a .blend file on a computer that does have a graphics device, like your client computer where you do your design work. Change the render engine to Network Render and configure it like you would a slave, being aware that the output folder specified in the file will be expected to exist on the remote machine. If this machine lives outside your LAN, you will want to set up port forwarding on your router and use dynamic DDNS. Since this is outside of the scope of this post, you should check out this explanation about port forwarding and this explanation about DDNS.
Once you have your .blend slave file created, you'll want to put it on the remote machine. Make sure Blender is installed. Replace the netrender plugin just as before. Make sure the output folder from the file exists on the machine. Blender can be started in slave mode with the following command:
blender -b --addons netrender [FILE LOCATION] -E NET_RENDER -a
What do these arguments mean?
- blender - The blender executable
- -b - Opens blender without a UI
- --addons netrender - Ensures that the netrender addon is loaded
- [FILE LOCATION] - The location of the slave .blend file
- -E NET_RENDER - Specifies the network render engine as the engine to use
- -a - Start the animation rendering
Note: The -a tells blender to start rendering the animation. This in turn tells the netrender add-on to begin its service and connect to the master.
Final Thoughts
You'll probably run into unique issues setting up your render farm. Don't let it get you down, because the result is well worth it. Reducing render times by multiple factors will way out weigh the time and effort it takes to install.
I'm still learning myself. I'd love to hear if this helps you out at all, or if you have any tips that could make my farm even better! If you have any comments, email me at jordan@jordanwages.com.